Configuring Data Assets
After creating a data asset, you can configure it by associating it with a supported data source and selecting the files or objects that will be part of the asset. Configuration enables the platform to understand the structure and location of the underlying data so that it can generate metadata, schema information, and profiling insights.
Depending on your access permissions and workflow requirements, configuration can be completed immediately after creation of a data asset or at a later stage.
To configure a data asset
-
After a data asset is created, you can either:
-
Click Configure in the dialog box.
Or
-
Click Configure Asset next to the required asset on the Data Assets dashboard accessed via the products screen.
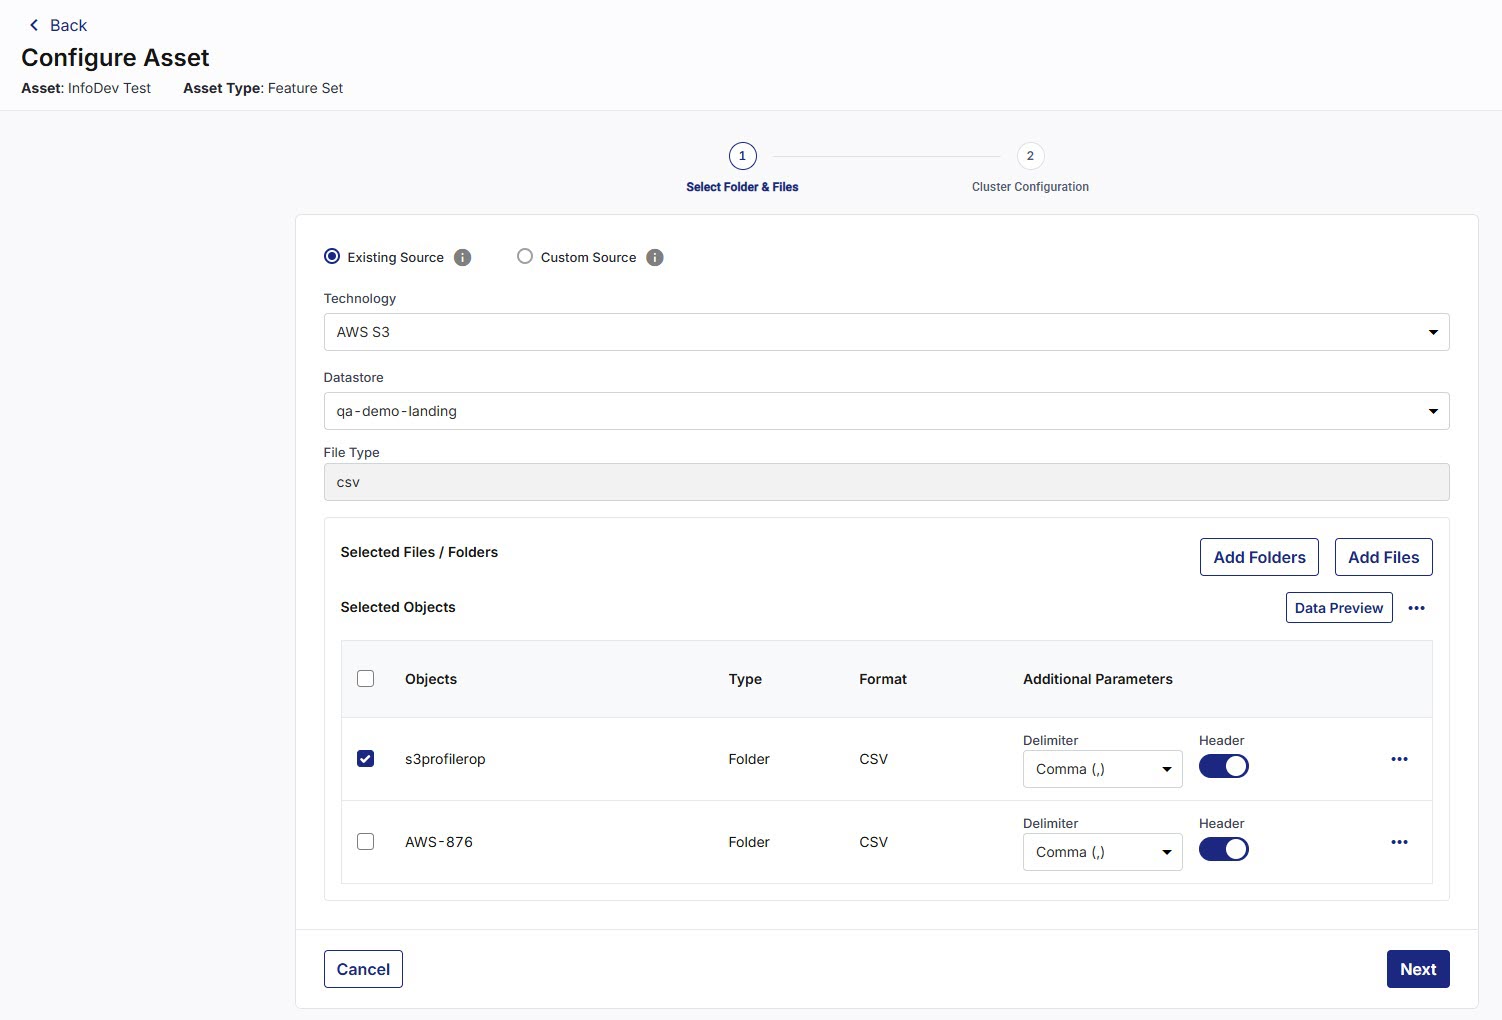
The Configure Asset screen appears.
-
-
In the Select Folder & Files step, provide the following details:
-
Select an existing source or define a custom source:
-
Existing Source - To select a source that is already configured in the platform
-
Custom Source - To configure a new source for the data asset[AT6.1][VB6.2]. This feature is currently unavailable for configuration.
-
-
Technology - Select the storage technology from the dropdown
-
Datastore - Select the datastore from the dropdown
-
File Type - Select the type of file from the dropdown
-
Add Folders - Select a folder from the available list
-
Add Files - Select a file from the available list
-
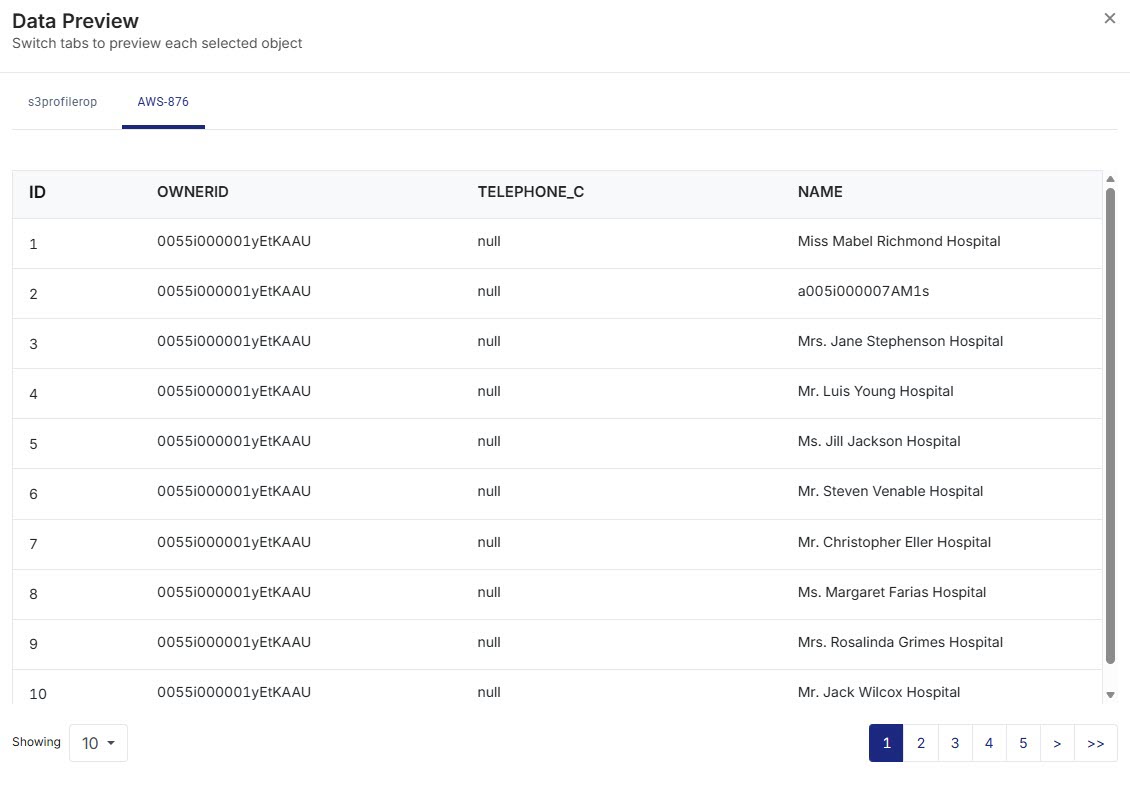
Data Preview - Displays the preview for the selected object(s) (files / folders) in a popup. If more than one object is selected, the data preview of selected objects is displayed in their respective tabs.

Note:
You can set Additional Parameters for each object data asset as required. Use the Remove or Delete option from the ellipsis to delete the added objects.
-
-
Click Next.
-
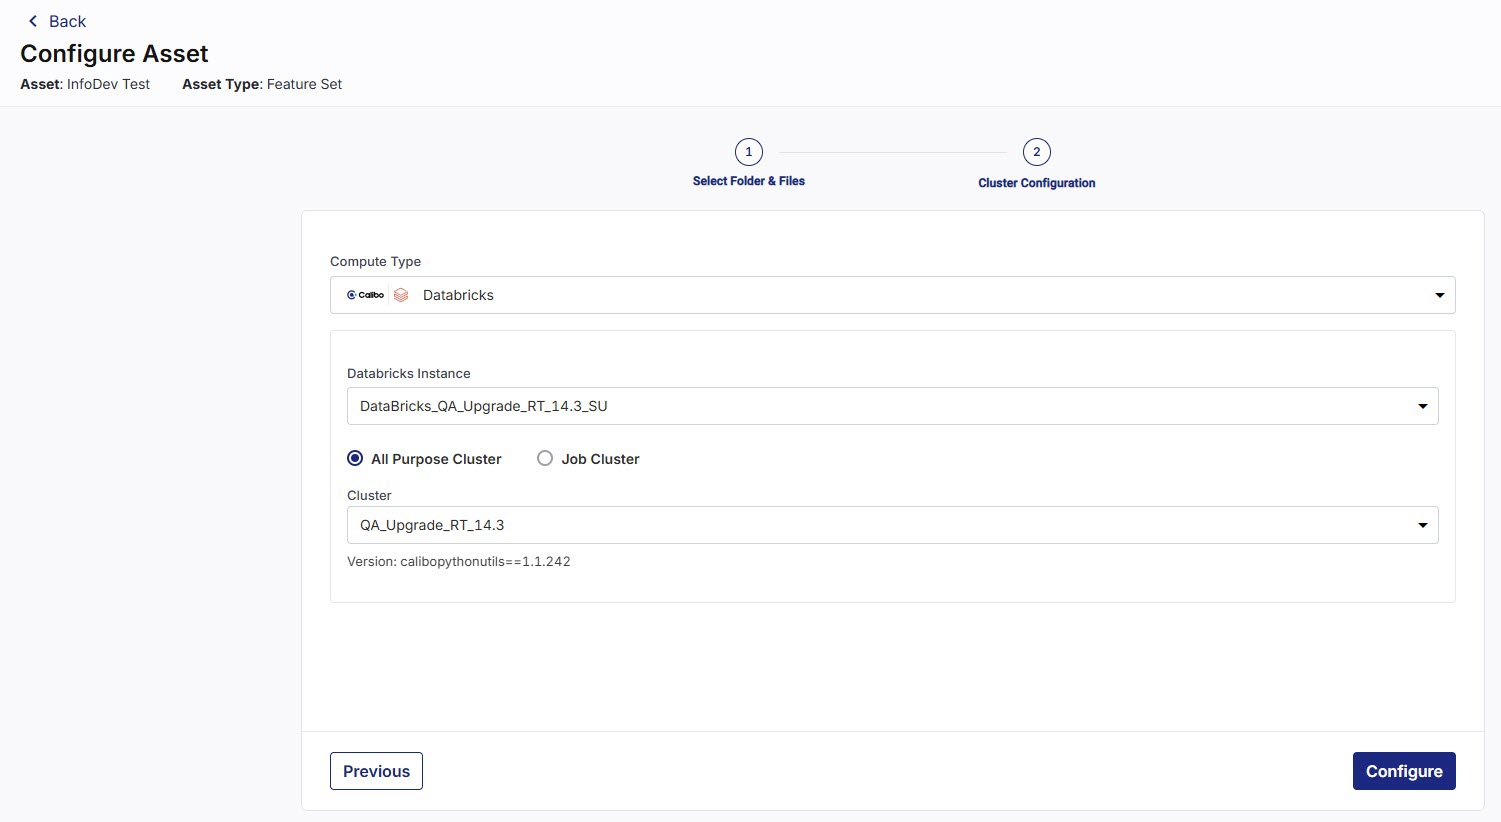
In the Cluster Configuration step, provide the following details:
-
Compute Type - Select the type of compute from the dropdown.
-
Databricks
-
Snowpark
-
-
Snowpark Instance - Select the Snowpark instance from the dropdown and enable the Use latest wheel package version option to show Current Wheel Package Version associated with the stored procedure.
Note:
You can upgrade the Wheel Package during the process of running the data asset.
-
Databricks Instance - Select the Databricks instance from the dropdown.
-
All Purpose Cluster - Select Cluster from the dropdown.
Note:
You can select an all-purpose cluster or a job cluster to run the configured job. In case your Databricks cluster is not created through the Calibo Accelerate platform and you want to update custom environment variables, see Updating Custom Variables for a Databricks Cluster. If you do not see a cluster configuration in the dropdown list, it is possible that the configured Databricks cluster has been deleted. In this case, you must create a new cluster and update the job configuration with the new cluster to ensure the job runs successfully.
-
Job Cluster - Select Policy from the dropdown and provide the following details as needed:
Cluster Details Field Description Policy Select a policy from the dropdown menu.
In Databricks cluster, a policy is a tool that workspace administrators can use to control and restrict how users or groups create compute resources, by enforcing a set of predefined rules.
For more information about policies, refer to the following links:
Cluster Type -
Multi Node
-
Single Node
Select the type of cluster that you want to create.
Cluster Name Provide a name for the Databricks cluster that you are creating. Enable Unity Catalog This option is available only if you are creating a Unity Catalog enabled Databricks cluster. Enable the toggle to use Unity Catalog functionality with this Databricks cluster. Access Mode For a Databricks data integration job, you can select either of the following access modes:
-
Assigned - This option allows a single user to run SQL, Python, R, and Scala workloads, with access to data secured in Unity Catalog.
-
Shared - This option allows multiple users to share the cluster to run SQL, Python, and Scala workloads on data secured in Unity Catalog.
Databricks Runtime Version Select a version based on the type of job for which you want to use the Databricks cluster.
Worker Type Select the processing capacity that you need. This is based on the use case you are trying to achieve. Workers Number of worker nodes. This depends on the kind of cluster you want to create. For example, a multi-node cluster requires a greater number of workers. Enable Autoscaling Turn on this toggle to control the infrastructure costs. If you enable this option, and provide values for Min Workers and Max Workers, the infrastructure costs begin at minimum workers and can scale up to maximum workers depending on the requirement. Terminate after below minutes of inactivity Use this option to control the infrastructure costs. Provide a value in minutes. If the Databricks cluster is inactive for the specified minutes, it is automatically terminated. Use latest Calibo UTIL version Enable this option to use the required utility. Cloud Infrastructure Details Field Description First on Demand Lets you pay for the compute capacity by the second. Availability Availability zone for a cluster. The instance type you want may be available only in certain zones. Zone Select a zone from the available options. Instance Profile ARN Instance Profiles allow you to access your data from Databricks clusters. Specify the Instance Profile ARN. EBS Volume Type Databricks provisions EBS volumes by default, for efficient functioning of the cluster. You can specify the type of EBS volume, the EBS volume count and the EBS volume size. EBS Volume Count EBS Volume Size Additional Details Field Description Spark Config You can fine-tune your spark jobs by providing custom Spark configuration properties. For more information see Spark configuration properties.
Enter the configuration properties as one key-value pair per line.
Environment Variables You can add the required environment variables.
Environment variables are used to configure various aspects of the behavior of the Databricks cluster and environment. For example: The Python version to use, number of worker instances to start on each worker node, location fo the Apache Spark installation on the cluster nodes, the logging level to be set for the cluster and so on.
Logging Path When you create a cluster, you specify the location where the logs for the Spark driver node, worker nodes, and events are stored.
Select the destination from the following options:
-
DBFS
-
S3
Log Level Select the level for logging that you want to set for this cluster. Choose from the following options:
-
ALL
-
DEBUG
-
ERROR
-
FATAL
-
INFO
-
OFF
-
TRACE
-
WARN
-
NONE
Init Scripts Set the destination and the path of the location where the init scripts for the cluster are stored. Init scripts customize the initialization process of the cluster by executing specified commands or scripts when the cluster spins up. The scripts perform various tasks like configuring the cluster environment, installing additional software packages, setting environment variables and so on. Specify the destination and the actual path for the init scripts:
-
Destination - Select from the following options:
-
Workspace
-
DBFS
-
S3
-
-
Init script path - Specify the actual path on the selected destination.
Type A table is created with the options that are selected in the previous step and the information is summarized as shown below:
Type File Path Region Delete dbfs dbfs:/logging - delete icon File Path Region Tags Tags allow you to monitor the cost of cloud resources used by various group within your organization. The tags that you add as key-value pairs are applied by Databricks to cloud resources like VMs, disk volumes and so on.
To add a tag, provide the following information:
-
Tag - Provide a name for the tag.
-
Value - Provide a value for the tag.
-
-
-
-
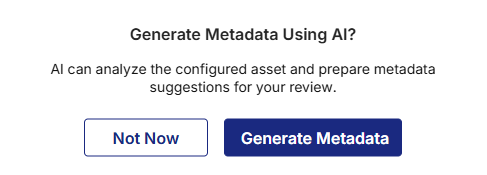
Click Configure. A confirmation message about the asset configured successfully displays with a dialog.
Note:
You can click Not Now to continue without generating metadata. If you skip metadata generation, you can generate metadata later from the Data Asset Details screen. For more information, see Exploring Data Asset Details.
-
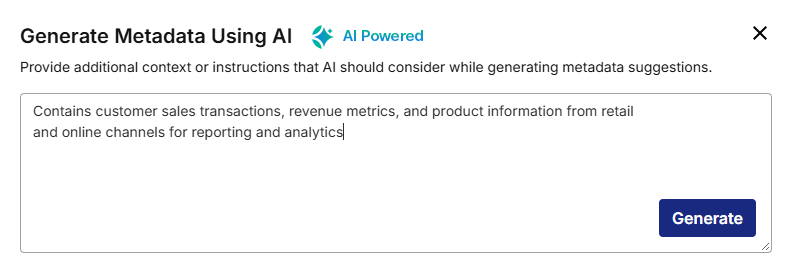
Click Generate Metadata. The Generate Metadata Using AI dialog appears.
-
In the textbox, provide additional information or instructions that AI should consider while generating metadata suggestions.
-
Click Generate. A confirmation message appears that the data asset is configured successfully.
Note:
When AI metadata generation is in progress, you cannot edit a data asset until generation is completed.
-
After metadata generation completes, the Generate Metadata Using AI screen displays the current metadata values and AI-generated suggestions side by side.
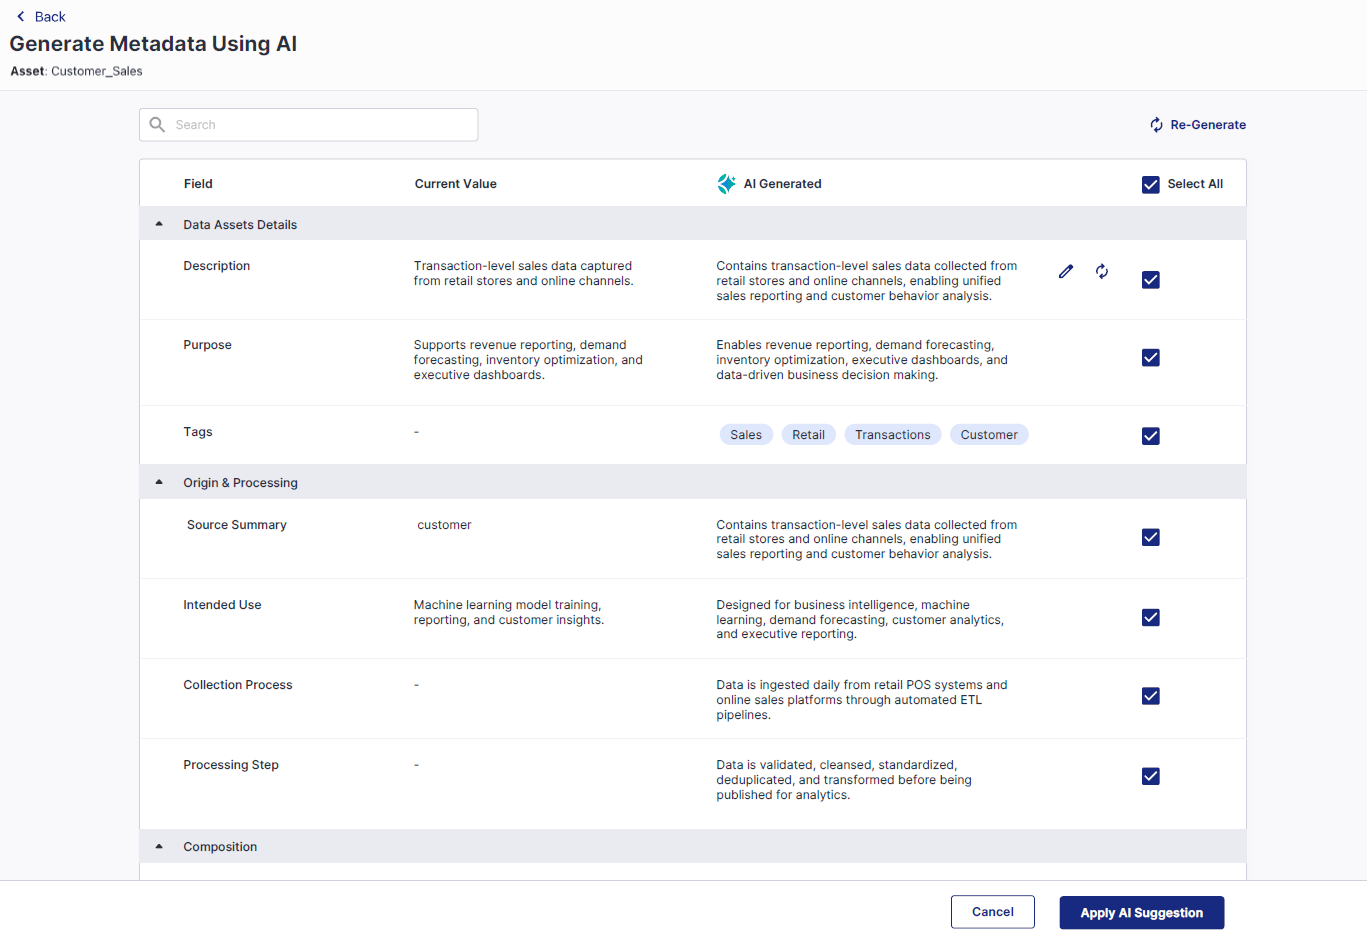
Important: AI-generated content is provided as a recommendation only. Always review and validate the generated metadata before applying or saving it. You are responsible for ensuring the accuracy and completeness of metadata and specifications.
-
Review the AI Generated metadata values for each field, then select the suggestions you want to apply. You can select individual fields or click Select All to apply the AI generated metadata suggestions.
To modify the AI generated metadata, do the following:
-
Hover over the required AI Generated suggestion.
-
Click the edit icon.
-
Edit the suggestion as required.
-
Click the tick icon.
Use the Re-Generate icon to regenerate the AI metadata suggestion for all fields or hover over the required AI Generated suggestion and click the re-generate icon to regenerate the AI metadata suggestion for a specific field.
-
-
Click Apply AI Suggestion. The selected values are applied to the metadata fields.
-
The data asset is configured successfully with the AI generated metadata suggestions as applicable and is displayed with an Unpublished status in the product-level Data Assets list, where it can undergo further actions and workflow processes as required.
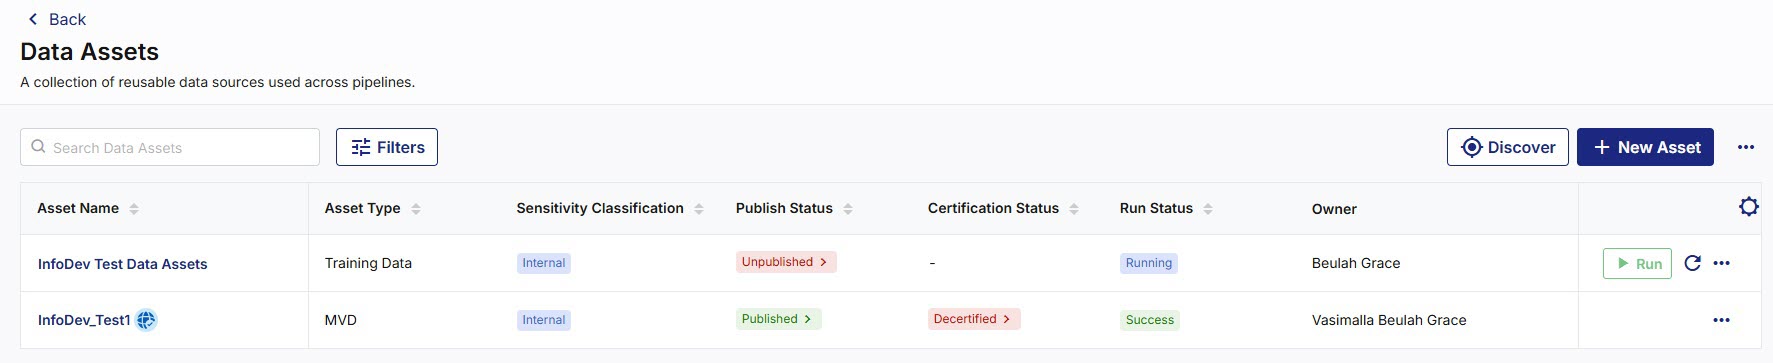
Once the data asset is configured, the job run status is displayed as Running by default, as the system automatically initiates job execution for the configured data asset. You can also run the job later.
|
What's next? Running Data Assets |
 Recommended Topics